Table of Contents
Here is a short video explaining the process, scroll down for detailed ingredients and step by step recipe method. Thanks for coming and do not forget to check other recipes on our homepage.
Okay, let me ask you something. Have you been going to restaurants and ordering burritos while chimichangas are sitting right there on the menu? Because if so — we need to have a talk.
A chimichanga (or “chimy chonga,” or “chim chunga” — however you say it, it’s delicious) is basically a burrito that someone looked at one day and thought, “What if we deep-fried this?” And whoever that person was, they deserve a medal. It’s crispy on the outside, juicy and cheesy and flavorful on the inside, and when you smother it in warm queso with a little sour cream and a scoop of pico de gallo? Game over.
The best part? You can absolutely make these at home. And once you do, you’ll never feel like you need to wait for a restaurant to get your chimichanga fix again.
Let’s get into it.
What You’ll Need
For the chicken:
- Chicken breasts (or thighs — more on that in a second)
- Salt, pepper, garlic powder
- Olive oil
- Half an onion, finely chopped
- A few cloves of garlic
- Lots of chili powder and cumin (ancho chili powder if you have it — it’s smokier and so good)
- Water
- Bouillon paste or a cube of chicken bouillon
- A can of green chilies
For the refried beans (totally worth making from scratch):
- Pinto beans, drained
- A little shortening, lard, or oil
- Garlic powder, onion powder, salt, cumin, chili powder
- A squeeze of lime
For rolling:
- Large flour tortillas
- Shredded pepper jack cheese (highly recommended)
- A little flour + water for your “glue”
For topping:
- Store-bought queso
- Sour cream
- Pico de gallo
Step 1: Make the Most Flavorful Chicken You’ve Ever Tasted
Here’s the secret to a great chimichanga: it’s not just about frying the outside. It’s about getting the inside deeply, richly flavorful — and that means making your chicken right.
Start by seasoning your chicken breasts generously with salt, pepper, and garlic powder. Don’t be shy here.
Heat up a deep skillet or saucepan with a drizzle of olive oil and sear the chicken on both sides to build a nice crust — about 2 to 3 minutes per side. We’re not cooking it through yet, just building flavor.
Scoot the chicken over, toss in your finely chopped onion and garlic, and scrape up all those delicious brown bits from the bottom of the pan. Add your chili powder and cumin — again, don’t be stingy — and then deglaze with water. Drop in your bouillon paste or cube, and bring the whole thing up to a simmer.
Now let it slowly cook, low and gentle. You don’t want dry, rubbery chicken breast. Slow is the move here.
Once the chicken is cooked through, pull it out and shred it. You want the shreds fairly fine — tender and delicate. (Chicken thighs work great here too, by the way. More forgiving and a little richer.)
Now take that liquid you cooked everything in and reduce it by about a third to a half — you’re aiming for around a cup and a half of concentrated, deeply flavored liquid gold. Let it go until it’s darker and thicker.
Add the shredded chicken back in along with the green chilies, stir it all together, and turn the heat off. It should look incredibly juicy and good.
Optional but amazing: Stir in some cream cheese at this point if you want an extra creamy filling. It’s a little indulgent, but it’s ridiculously good.
Step 2: Quick Homemade Refried Beans (Don’t Skip This)
Yes, you can buy refried beans in a can. But hear me out — making them yourself takes maybe 10 minutes and the difference is real.
Heat a little shortening (or oil, or lard if you’re feeling classic) in a skillet. Add your drained pinto beans and let them fry, stirring occasionally. Season with garlic powder, onion powder, salt, a pinch of cumin, and a pinch of chili powder.
Once they’ve fried up and thickened a bit, take a potato masher and mash them to your liking. Some people like them totally smooth, but a little texture is really nice here. Finish with a squeeze of lime and turn off the heat.
That’s it. That’s refried beans. You’ll never want the canned stuff again.
Step 3: Roll Them Up (And Glue Them Shut)
Here’s something you don’t do with a regular burrito: you make a little flour-and-water slurry to seal the edges. This is important. Since we’re frying these in oil, we need them to stay closed — otherwise all that beautiful filling will end up in your hot oil and nobody wants that.
Just mix a couple tablespoons of flour with a few tablespoons of water until you have a thin paste. That’s your glue.
Now, lay out your tortilla and layer it up:
- A spoonful of refried beans
- A generous handful of shredded cheese (pepper jack is highly recommended)
- Your juicy chimichanga chicken on top
Before you fold it up, brush or spread a little of the flour slurry around the edges. Then fold it up like a burrito — sides in, roll it tight — pressing gently so everything seals.
One great tip: You can assemble these completely ahead of time. If you’re having people over, make a whole batch, set up your oil outside on the deck, and just fry them to order. Easy, impressive, and everyone will think you’re incredible.
Step 4: Fry Them Up
Heat your oil to 350°F in a deep skillet or pot.
They go in as burritos. They come out as chimichangas.
Fry them until golden brown and deeply crispy on all sides, turning as needed. Since everything inside is already cooked, you’re just going for that perfect crunchy exterior — it doesn’t take long.
When you pull them out, you’ll know. That crunch sound is the sound of something wonderful.
What About the Air Fryer?
Yes, you can air fry these. Will it be as outrageously crispy and perfect as the deep-fried version? Honestly, no — you do sacrifice a little of that experience. But will it still be delicious? Absolutely yes.
If you go the air fryer route, brush the outside with melted butter before you pop them in. That’s the move.
The Perfect Bite
Now this is where things get really good.
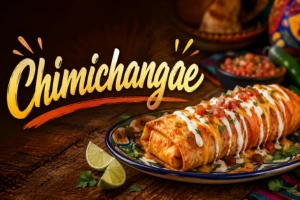
Mix a little sour cream into your store-bought queso and warm it up. Pour it over the top of your chimichanga. Add a scoop of pico de gallo, and maybe a little sour cream on the side.
Then cut it open.
Look at that crispy shell. Look at all that juicy, flavorful chicken. The melted cheese. The creamy beans. It’s everything.
Final Thoughts
This is one of those recipes that feels like a project but is actually very manageable, especially if you break it into steps. The chicken simmers while you make your beans. You can roll them all ahead. And frying takes minutes.
Once you’ve made chimichangas at home — crispy, golden, smothered in queso, loaded with the most flavorful chicken filling — going out to order a plain burrito is going to feel like a downgrade.
Make these for a party. Make them for dinner. Make them on a Tuesday just because.
Let me know how yours turn out — and don’t be surprised if they disappear faster than you expect.